
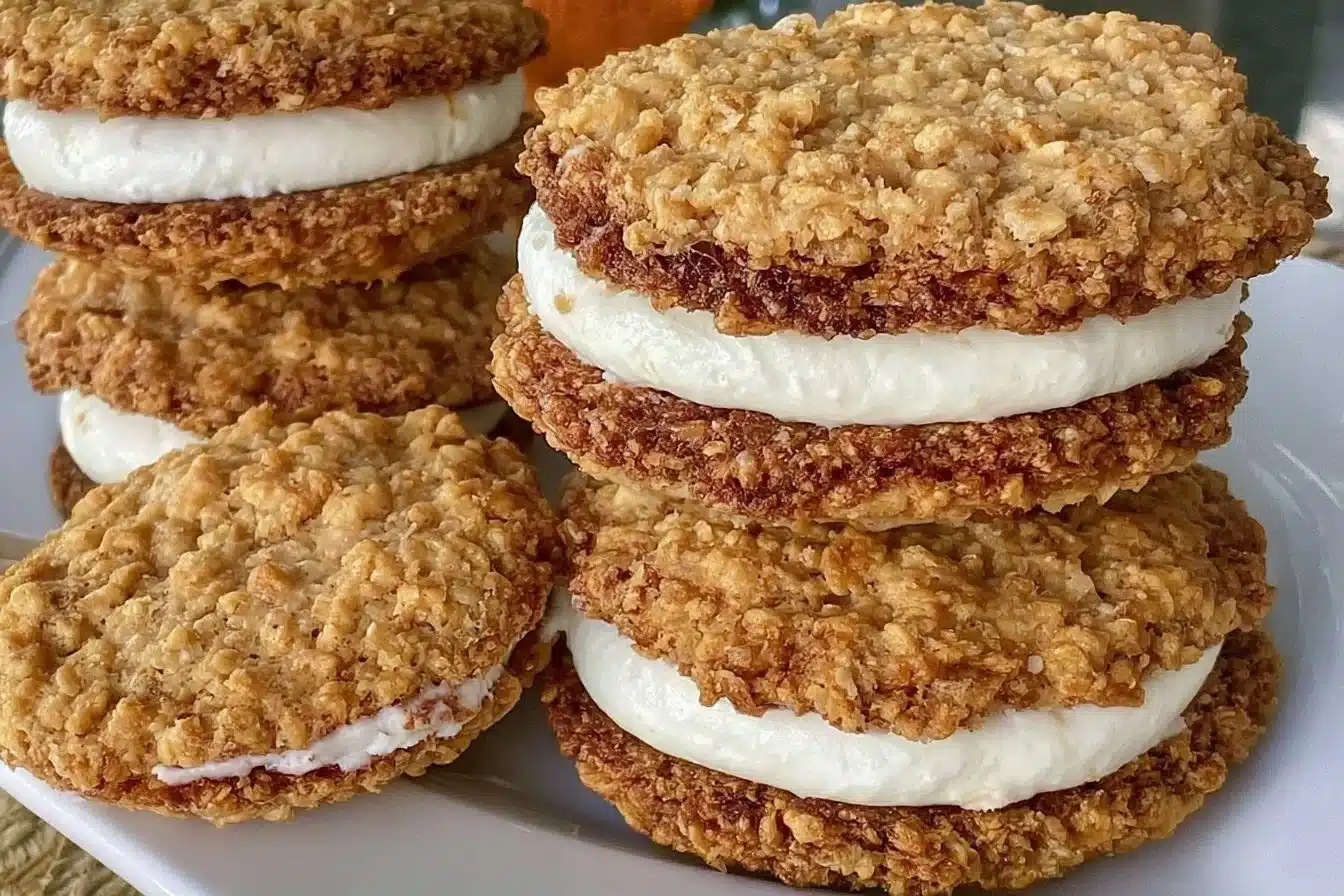
Gluten-Free Oatmeal Cream Pies (Better than Little Debbie!)
As the leaves begin to turn and the aroma of spices fills the air, there’s something undeniably cozy about fall. One of my absolute favorite treats that perfectly encapsulates that feeling is the classic oatmeal cream pie. This gluten-free version is not only reminiscent of the beloved Little Debbie snack but also elevates it, showcasing homemade goodness that warms the heart. Trust me, once you try these Gluten-Free Oatmeal Cream Pies, you’ll never look back. You may also find Banana Nice Cream Gluten Free Dairy Free useful.
These delightful cookies, filled with sweet cream, are perfect for dipping into hot cider or enjoying with a cup of coffee. With each bite, you get a satisfying chewy texture paired with a creamy center that brings nostalgia in every morsel. If you’re ready to dive in, let’s gather our ingredients! You may also find Easy Gluten Free Cupcakes With Buttercream Frosting useful.
Ingredients List
To make your Gluten-Free Oatmeal Cream Pies, you will need: You may also find Gluten Free Air Fryer Boston Cream Donuts Youll Love useful.
- 1 cup gluten-free rolled oats
- 1 cup gluten-free flour blend
- 1/2 teaspoon baking powder
- 1/2 teaspoon baking soda
- 1/4 teaspoon salt
- 1/2 cup brown sugar
- 1/2 cup granulated sugar
- 1/2 cup unsalted butter, softened (or a vegan substitute)
- 1 large egg
- 1 teaspoon vanilla extract
- 1 cup powdered sugar (for the filling)
- 1/4 cup butter, softened (for the filling)
- 1 teaspoon vanilla extract (for the filling)
For a delightful twist, consider topping your oatmeal pies with a dollop of coconut whipped cream as well!
Step-by-Step Instructions
Preheat Your Oven: Start by preheating your oven to 350°F (175°C). Prepare your baking sheets by lining them with parchment paper.
Mix Dry Ingredients: In a medium bowl, combine the gluten-free flour, oats, baking powder, baking soda, and salt. Whisk them together until well mixed.
Cream the Butter and Sugars: In another bowl, cream together the softened butter, brown sugar, and granulated sugar until the mixture is light and fluffy. This step is crucial for achieving that perfect texture!
Add Egg and Vanilla: Beat in the egg and vanilla extract until fully incorporated.
Combine Wet and Dry Ingredients: Gradually add the dry ingredients to the wet mixture. Stir until everything is combined and you have a thick dough.
Scoop and Shape: Use a tablespoon to scoop out portions of the dough and roll them into balls. Place them on the prepared baking sheets, leaving space in between as they will spread while baking.
Bake: Bake for 10-12 minutes, or until the edges are golden. The centers may look slightly underbaked, but they will firm up as they cool.
Prepare the Filling: While the cookies cool, make the filling by creaming together the softened butter, powdered sugar, and vanilla extract in a bowl until smooth and fluffy.
Assemble: Once the cookies have cooled completely, spread a generous dollop of cream filling on the flat side of one cookie and sandwich it with another cookie.
Tips for Success
- Make sure to use a gluten-free flour blend that includes xanthan gum for better texture.
- For a chewier version, you can slightly underbake the cookies.
- If you want to mix things up, try adding chocolate chips or nuts to your cookie dough!
- After assembling your pies, you can also try adding a sprinkle of flaked sea salt on the filling for a contrasting flavor.
If you’re looking for another simple dessert to complement your fall baking, check out these cream cheese frosted muffins.
Possible Variations
- Gluten-Free Options: Make sure to stick to certified gluten-free products when baking.
- Streusel Topping: For added crunch, sprinkle some gluten-free streusel topping on the cookies before baking.
- Dairy-Free: Substitute the butter with a vegan alternative to make these pies dairy-free.
Storage Recommendations
To keep your Gluten-Free Oatmeal Cream Pies fresh, store them in an airtight container at room temperature for up to 5 days. For longer storage, consider freezing the assembled pies. Just place them in a freezer-safe container, and they will hold up well for about a month—perfect for when you have cookie cravings outside of the fall season!
Conclusion
These Gluten-Free Oatmeal Cream Pies truly bring the taste of nostalgia into your home while accommodating dietary restrictions. They not only celebrate the flavors of autumn but also provide a delightful treat for everyone to enjoy. If you’re interested in exploring more gluten-free treats, you might want to check out this tempting recipe for Gluten-Free Oatmeal Cream Pies.
FAQs
1. Can I make these oatmeal cream pies vegan?
Yes, you can use a vegan butter substitute and a flax egg (1 tablespoon ground flaxseed mixed with 2.5 tablespoons water) instead of the regular egg to make them vegan-friendly.
2. How do I know when my cookies are done baking?
The edges should be golden brown, and the centers will look slightly puffy. They will firm up as they cool on the baking sheet.
3. Can I use quick oats instead of rolled oats?
While rolled oats provide a better texture in these cookies, you can use quick oats if that’s what you have on hand. Just note that the texture might be a bit different.
4. What if I want to make a smaller batch?
You can easily halve the recipe if you’d like to make fewer pies. Adjust the ingredients accordingly, and you should still achieve delicious results!
Gluten-Free Oatmeal Cream Pies
Ingredients
Cookie Ingredients
- 1 cup gluten-free rolled oats
- 1 cup gluten-free flour blend
- 1/2 teaspoon baking powder
- 1/2 teaspoon baking soda
- 1/4 teaspoon salt
- 1/2 cup brown sugar
- 1/2 cup granulated sugar
- 1/2 cup unsalted butter, softened (or a vegan substitute)
- 1 large egg
- 1 teaspoon vanilla extract
Filling Ingredients
- 1 cup powdered sugar (for the filling)
- 1/4 cup butter, softened (for the filling)
- 1 teaspoon vanilla extract (for the filling)
Instructions
Preparation
- Preheat your oven to 350°F (175°C) and line baking sheets with parchment paper.
- In a medium bowl, mix together gluten-free flour, oats, baking powder, baking soda, and salt.
- In another bowl, cream together softened butter, brown sugar, and granulated sugar until light and fluffy.
- Beat in the egg and vanilla extract until fully incorporated.
- Gradually add the dry ingredients to the wet mixture and stir until combined into a thick dough.
- Scoop tablespoon-sized portions of dough and roll into balls, placing them on prepared baking sheets.
Baking
- Bake for 10-12 minutes, or until edges are golden. Centers may appear underbaked but will firm up as they cool.
Filling Preparation
- While cookies cool, cream together softened butter, powdered sugar, and vanilla extract for the filling until smooth and fluffy.
Assembly
- Spread a generous dollop of cream filling on the flat side of one cookie and sandwich it with another cookie.