
No Knead Gluten Free Bread is more than just a loaf; it’s freedom for anyone craving classic Italian comfort without gluten. In this article, you’ll discover how this rustic bread became my daily ritual as a Tuscan born chef living gluten free in the U.S. We’ll cover how to make it, what ingredients keep it soft and tasty, baking secrets, and ways to serve it fresh every time. Whether you’re baking for health or taste, this guide gives you the practical steps to enjoy bread that respects your body and roots. Let’s get into my kitchen together!
Table of Contents
My No Knead Gluten Free Bread Story
How It Started: Bringing Back Tuscan Bread Without the Wheat
I still remember standing barefoot in my old Tuscan kitchen, craving that fresh bakery scent. Giving up gluten meant I had to say goodbye to chewy pane, crunchy bruschetta, and soft focaccia unless I found a way back. That’s how No Knead Gluten Free Bread became my daily experiment.
The beauty of this recipe? You don’t spend twenty minutes kneading sticky dough that sticks to your fingers. A big bowl, a wooden spoon, a bit of time nature does the work. Long resting brings out the flavor. The result: a rustic loaf that holds its shape, with a crust you’ll hear crackle when you slice it.
When I first shared my version with neighbors, they couldn’t believe it was gluten free. Now I bake it for family dinners and weekend brunches. If you love soft, tender loaves too, you’ll want to check my Soft Homemade Gluten-Free Bread for an everyday sandwich option or enjoy a sweet slice of Gluten-Free Dairy-Free Banana Bread with your morning coffee.
Why No Knead Works Best for Gluten Free
Here’s the trick: gluten free flours don’t have elastic gluten strands, so we rely on water and rest time to do the magic. A wet dough hydrates the starches, giving structure without kneading. This means fewer steps, no muscle work, and a crusty loaf that feels like home. For busy cooks or new bakers, this simple method unlocks real bread without stress.
Ingredients & Mixing for No Knead Gluten Free Bread
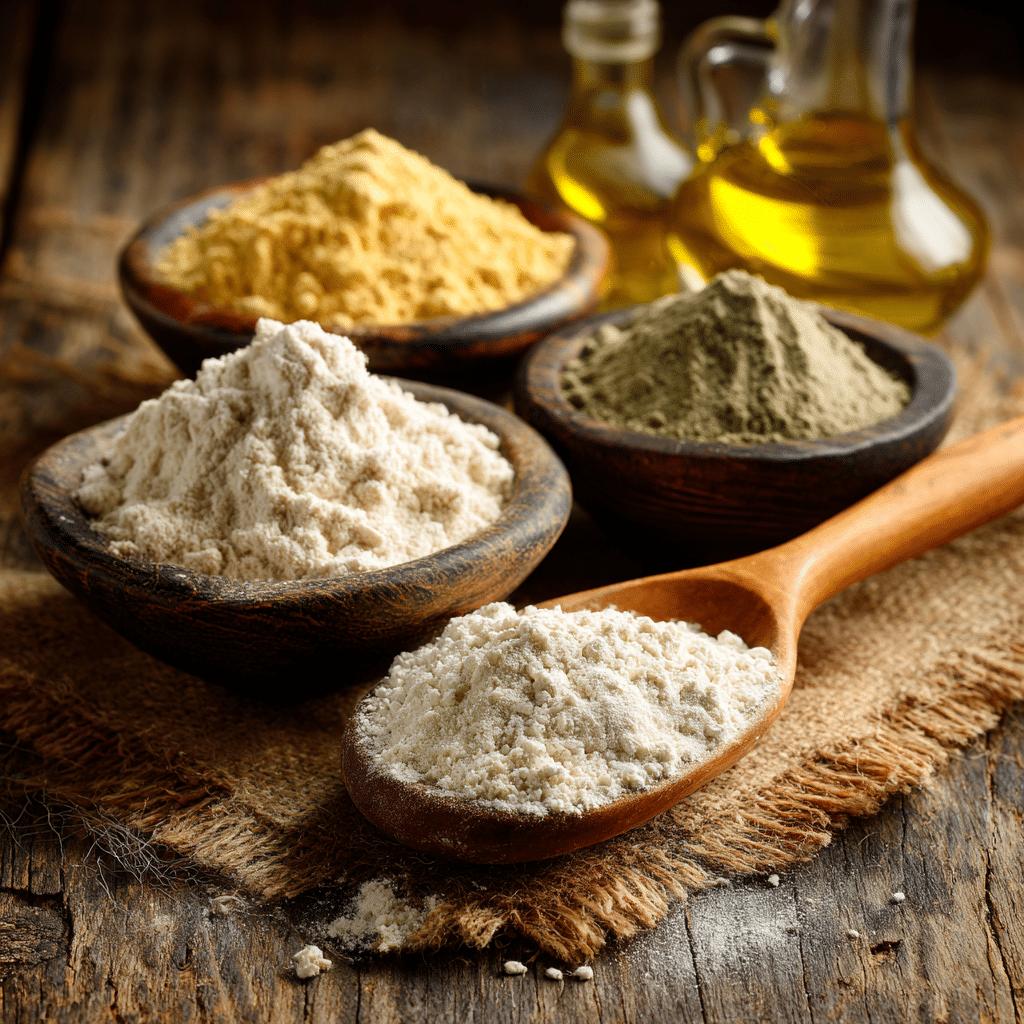
Choosing the Right Gluten Free Flours
Getting the perfect No Knead Gluten Free Bread starts with picking flours that balance softness and structure. My go to mix is a blend of rice flour, potato starch, and a bit of sorghum or millet. This trio gives the loaf a tender crumb without falling apart. Some bakers love adding a spoon of psyllium husk trust me, it’s worth it. It helps bind moisture and gives the dough a stretch you wouldn’t expect from gluten free flour.
Always use fresh, high quality ingredients. Old flours can turn your loaf heavy and bland. I keep my gluten free flour in airtight jars, ready for spontaneous baking days. If you want to get creative with other flatbreads too, take a peek at my Gluten-Free Naan Bread it’s the perfect companion to this bread journey.
Simple Mixing, Big Flavor
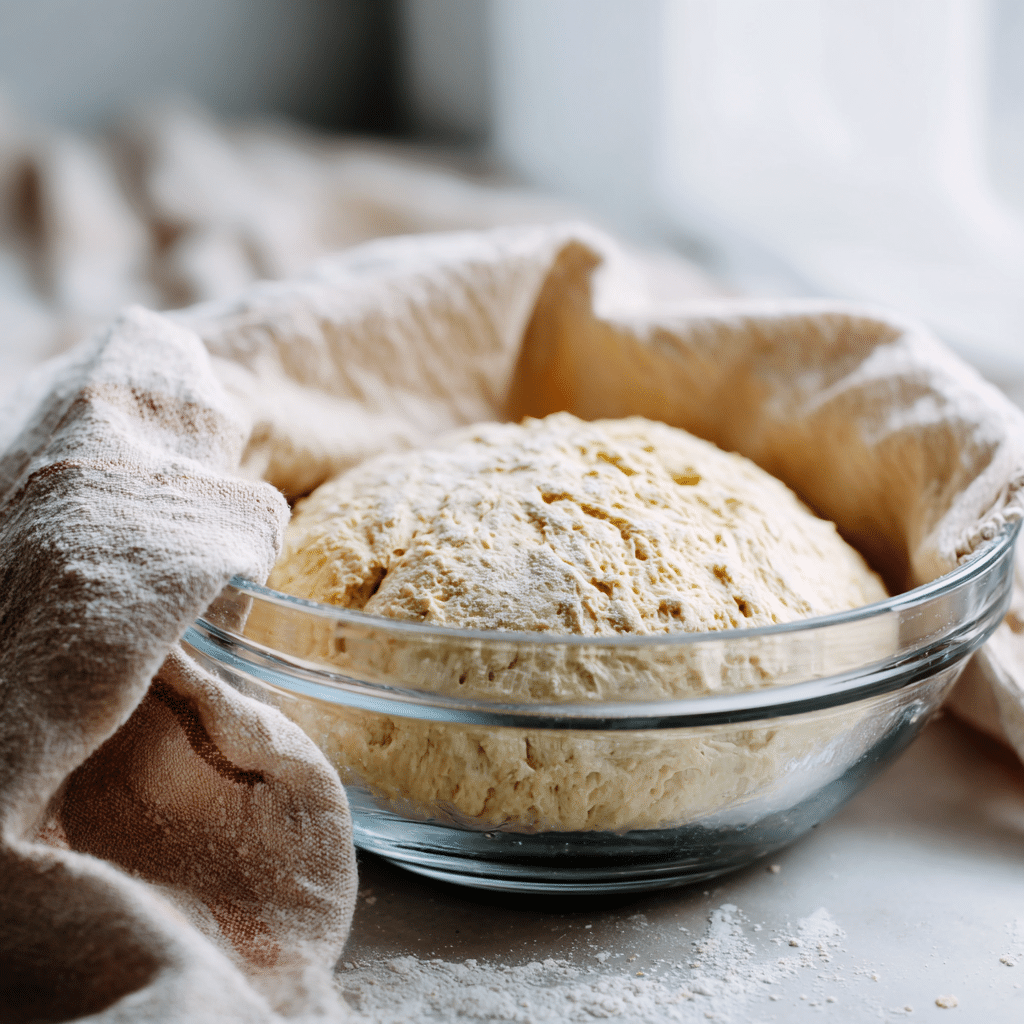
Unlike traditional bread, No Knead Gluten Free Bread doesn’t need a stand mixer or dough hook. In a big bowl, combine your flours, yeast, salt, and a drizzle of olive oil if you like a softer crumb. Pour in lukewarm water and stir gently with a wooden spoon. The dough should look loose and sticky that’s exactly what you want. Cover it up and forget about it for at least 8–12 hours. This slow rise develops deep flavor while the starches hydrate fully.
I love prepping my dough at night. By morning, it’s airy and bubbly, ready to bake. While you wait, why not plan tomorrow’s treat with my Vegan Cinnamon Rolls Gluten-Free? They’re another cozy option when you’re craving sweet, soft gluten-free baking.
This easy, forgiving mix is what makes No Knead Gluten Free Bread special less stress, more flavor, and results that taste like old-world Italian loaves without the wheat.
Shaping & Baking No Knead Gluten Free Bread
Shaping the Dough Without Stress
One reason I fell in love with No Knead Gluten Free Bread is how forgiving it is when shaping. After the slow overnight rise, you’ll see bubbles and a wobbly texture that’s perfect. Dust your work surface with a little rice flour, scrape out the dough, and fold it gently over itself a few times to build tension. No rough handling, no wrestling. Just shape it into a rough ball or oval and place it on parchment paper.
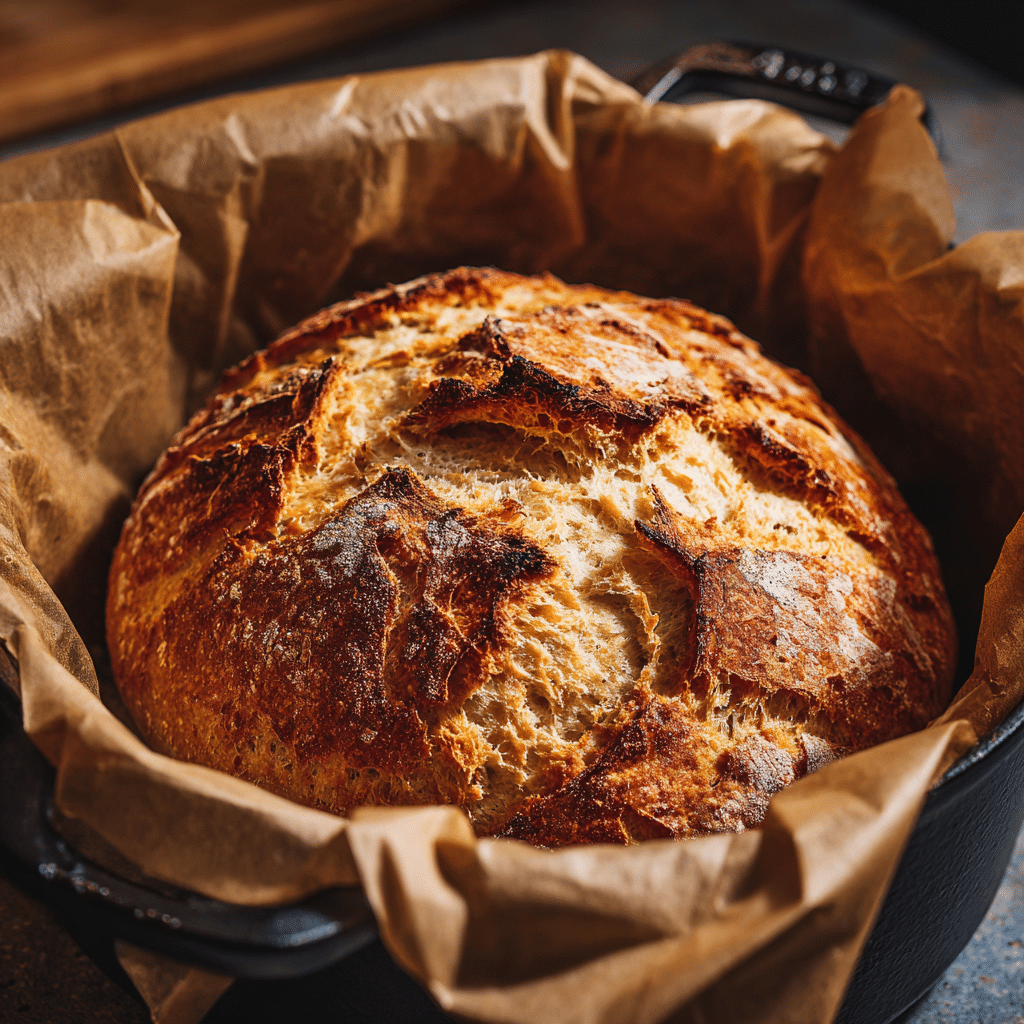
A trick I swear by: preheat your Dutch oven inside your oven while you shape. The intense heat gives your gluten-free loaf that bakery style rise and a crispy crust. If you love experimenting with shapes, try my Gluten-Free Pizza Rolls for a fun twist same soft crumb, different shape!
Bake for a Crusty Finish
Baking No Knead Gluten Free Bread is where the magic happens. Slide the shaped dough with parchment into your hot Dutch oven, cover with the lid, and bake at high heat for 30 minutes. This traps steam, mimicking a bakery oven. Then, uncover and bake another 15–20 minutes until the crust turns deep golden and cracks beautifully.
Don’t rush this step the color means flavor. Tap the bottom of the loaf: if it sounds hollow, it’s done. Cool it on a wire rack so steam doesn’t make the crust soggy.
If you love bold, hearty bakes, pair this loaf with my Pizza Gluten-Free Recipe. Fresh bread and pizza nights that’s how you keep Italian comfort alive without the gluten.
This easy baking ritual will fill your kitchen with warmth and a scent that brings everyone to the table. Next, I’ll show you how to serve it, store it, and keep every slice perfect.
Serving & Storing No Knead Gluten Free Bread
Best Ways to Serve Your Fresh Loaf
When your No Knead Gluten Free Bread is still warm, resist slicing it too early let it rest at least 30 minutes to lock in moisture. Serve thick slices with a drizzle of olive oil, fresh herbs, or a pat of butter. For breakfast, toast it with jam or avocado. For dinner, it’s perfect next to soup or a fresh salad.
If you want to bring an Italian vibe to your table, pair this bread with hearty sides or dips. I love dunking a warm slice into tomato soup or using it as a base for garlic bread. Craving something sweeter? Bake up my Gluten-Free Waffle Recipe Fluffy for brunch and turn your leftovers into a cozy weekend treat.
Smart Storage & Extra Ideas
Homemade No Knead Gluten Free Bread stays best at room temperature in a bread bag or wrapped in a clean kitchen towel. Avoid the fridge it dries out too fast. If you won’t finish it in two days, slice and freeze it. Toast slices straight from the freezer for a fresh taste every time.
Got stale ends? Don’t toss them make gluten-free breadcrumbs or rustic croutons for salads. If you love experimenting with leftover bakes, you’ll enjoy my Gluten-Free Sourdough Cinnamon Rolls too. Both recipes show how flexible gluten-free baking can be without losing a crumb of flavor.
Homemade bread should never feel like a chore. With this easy no knead method, you’ll have a crusty, wholesome loaf ready whenever you want it no wheat, no fuss, just pure Italian comfort.
Conclusion
Making No Knead Gluten Free Bread brought me back to my Tuscan roots no kneading, no stress, just real bread that respects your body. I hope this guide inspires you to bake with confidence and share every warm slice with people you love. Remember, living gluten-free never means living without good bread.
What is the best flour for No Knead Gluten Free Bread?
A blend of rice flour, potato starch, and sorghum or millet flour works best. This mix keeps the bread light yet sturdy, with great flavor.
How do I get a crispy crust on gluten free bread?
Bake your loaf in a preheated Dutch oven with the lid on for steam, then finish uncovered. This creates that classic crackly crust.
Can I freeze No-Knead Gluten Free Bread?
Yes! Slice it first, wrap well, and freeze. Toast slices straight from the freezer for the best texture and taste.
Why is my gluten free bread dense?
Too much flour or not enough hydration can make it heavy. Stick to a sticky, wet dough and give it plenty of rise time.

No-Knead Gluten-Free Bread
Ingredients
- Rice flour
- Potato starch
- Sorghum or millet flour
- Psyllium husk optional
- Instant yeast
- Salt
- Olive oil optional
- Lukewarm water
Instructions
- In a large bowl, mix rice flour, potato starch, sorghum or millet flour, psyllium husk, yeast, and salt.
- Add lukewarm water and a drizzle of olive oil if desired.
- Stir with a wooden spoon until the dough is sticky and loose.
- Cover the bowl and let it rest at room temperature for 8–12 hours.
- After resting, dust a surface with rice flour and gently fold the dough over itself a few times.
- Shape into a ball or oval on parchment paper.
- Preheat a Dutch oven in the oven to high heat.
- Place the dough with parchment into the hot Dutch oven, cover, and bake for 30 minutes.
- Remove the lid and bake another 15–20 minutes until the crust is golden and loaf sounds hollow underneath.
- Cool on a wire rack at least 30 minutes before slicing.