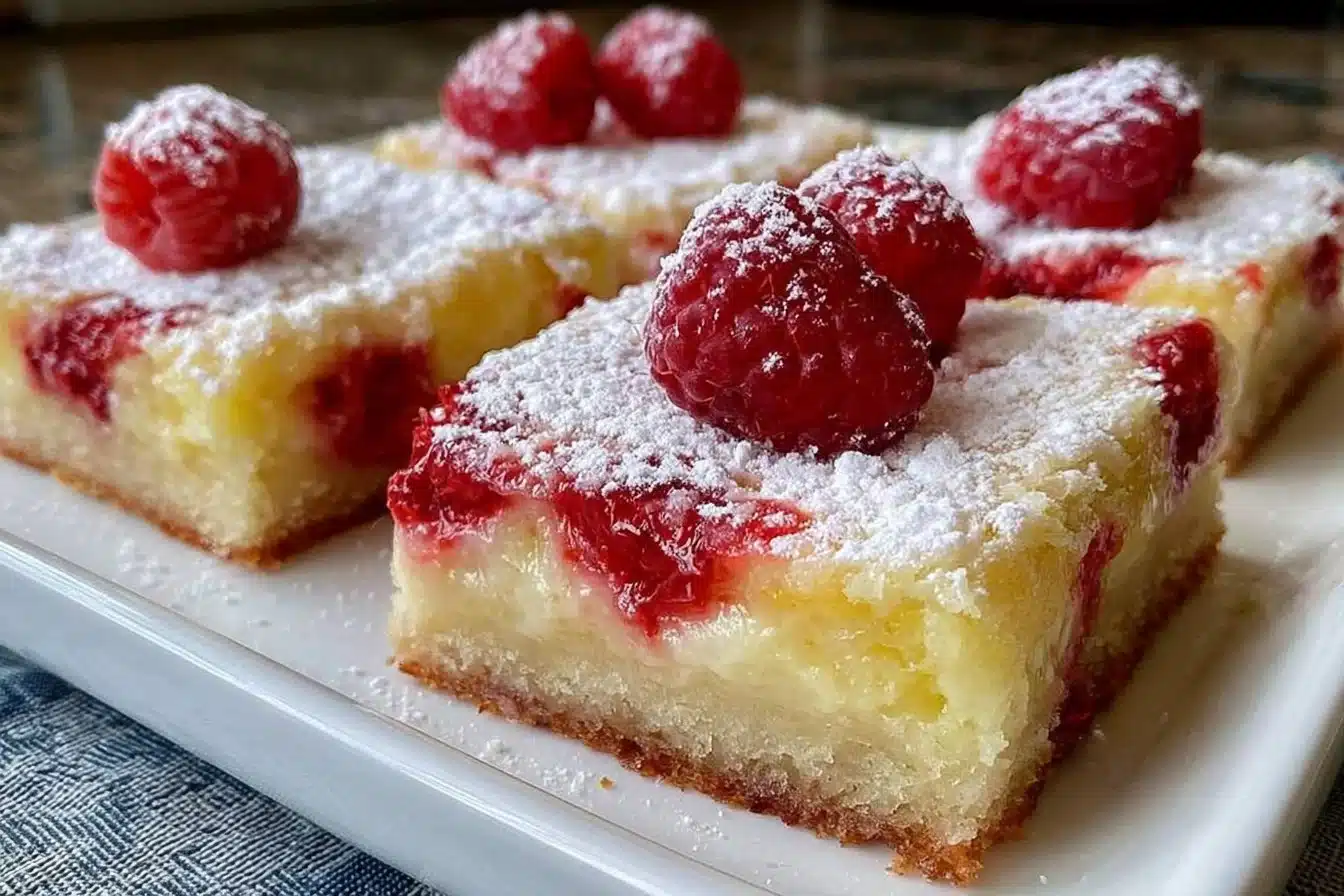
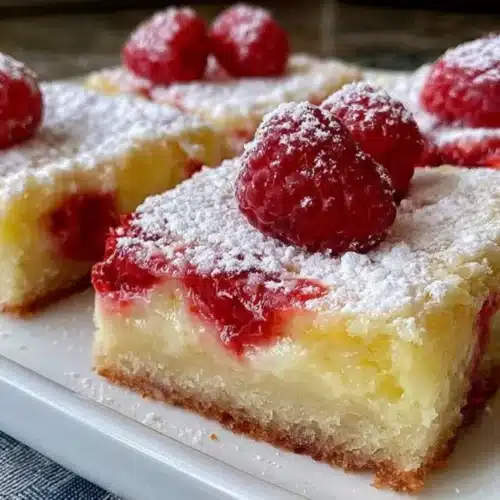
Gluten-Free Raspberry Lemon Bars: A Delightful Seasonal Treat
As the leaves begin to fall and cozy aromas waft through the air, there’s nothing quite like a slice of homemade gluten-free raspberry lemon bars to brighten up a chilly afternoon. These delicious treats bring together the tartness of fresh raspberries and the refreshing zing of lemon, creating a perfect balance of flavors that home bakers adore. With an easy-to-follow recipe, you too can indulge in these gluten-free delights that are sure to become a seasonal favorite. You may also find Gluten Free Raspberry Lemon Bars useful.
Ingredients List
To create these scrumptious gluten-free raspberry lemon bars, you’ll need the following ingredients: You may also find Gluten Free Lemon Bars 2 useful.
Crust: You may also find Gluten Free Lemon Bars Recipe useful.
- 1 cup gluten-free all-purpose flour
- 1/4 cup powdered sugar
- 1/2 cup cold butter, cut into cubes
- 1/4 teaspoon salt
Filling: You may also find Gluten Free Lemon Bars useful.
- 2 large eggs
- 3/4 cup granulated sugar
- Zest and juice of 1 large lemon
- 1/4 cup gluten-free all-purpose flour
- 1 cup fresh raspberries
Step-by-Step Instructions
Preheat your oven to 350°F (175°C). Line an 8×8 inch baking pan with parchment paper, leaving some overhang to make it easier to lift the bars out later.
Make the crust: In a medium bowl, mix together the gluten-free flour, powdered sugar, and salt. Cut in the cold butter until the mixture resembles coarse crumbs. Press this mixture evenly into the bottom of your prepared pan.
Bake the crust for about 15 minutes, or until lightly golden. Remove from the oven and set aside to cool slightly.
Prepare the filling: In another bowl, whisk together the eggs, granulated sugar, lemon zest, and lemon juice until smooth. Gradually mix in the gluten-free flour until well combined. Gently fold in the fresh raspberries.
Bake again: Pour the raspberry lemon filling over the cooled crust and return the pan to the oven. Bake for an additional 20-25 minutes, or until the filling is set and no longer jiggles.
Cool and slice: Allow the bars to cool completely in the pan on a wire rack. Once cool, lift the bars out using the parchment paper overhang, and slice them into squares.
Tips for Success
Use fresh raspberries: For the best flavor and texture, always opt for fresh raspberries. They add a burst of freshness to the bars and help to balance the tart lemon.
Experiment with flavors: If you enjoy experimenting in the kitchen, consider adding a touch of lavender or mint to the filling for an added layer of flavor.
Gluten-free flour choices: Not all gluten-free flours are created equal. If you’re looking for a reliable substitute, you can try a blend designed for baking, which often includes xanthan gum for better structure.
Serving suggestions: For an extra delightful twist, you might want to dust the bars with powdered sugar before serving, or even enjoy them with a dollop of whipped cream.
Possible Variations
There are endless possibilities when it comes to customizing your gluten-free raspberry lemon bars. You can:
Add a streusel topping: Mix some gluten-free flour with sugar and butter to create a crumbly topping before baking for a delightful crunch.
Incorporate other fruits: Try substituting part of the raspberries with blueberries or blackberries for a mixed berry version.
For more delicious recipes featuring similar ingredients, check out our gluten-free lemon and raspberry loaf cake for a delightful twist on this classic flavor pairing.
Storage Recommendations
These gluten-free raspberry lemon bars can be stored in an airtight container in the refrigerator for up to one week. They can also be frozen for longer shelf life—simply wrap them tightly in plastic wrap and place them in a freezer-safe container. Thaw in the fridge overnight before enjoying them again.
Conclusion
In summary, gluten-free raspberry lemon bars are not only a delicious way to enjoy seasonal flavors but also an easy bake that brings comfort and joy to any gathering. Whether serving at a family dinner or a gathering of friends, these bars are bound to impress. For an exciting variation, you can explore the delightful Lemon Raspberry Crumble Bars recipe that adds a crunchy twist to your dessert table.
FAQs
1. Can I replace the raspberries with another fruit?
Yes, you can substitute raspberries with blueberries, strawberries, or blackberries for a similar taste profile.
2. What gluten-free flour works best for this recipe?
A gluten-free all-purpose flour blend that contains xanthan gum is recommended for best results.
3. How do I know when the lemon bars are done baking?
The lemon filling should be set and not jiggle when you gently shake the pan. Additionally, the edges will start to pull away slightly from the pan.
4. Can I make these bars ahead of time?
Absolutely! They can be made a day in advance and stored in the refrigerator until you’re ready to serve them.
Gluten-Free Raspberry Lemon Bars
Ingredients
Crust
- 1 cup gluten-free all-purpose flour
- 1/4 cup powdered sugar
- 1/2 cup cold butter, cut into cubes
- 1/4 teaspoon salt
Filling
- 2 large eggs
- 3/4 cup granulated sugar
- 1 large zest and juice of 1 large lemon
- 1/4 cup gluten-free all-purpose flour
- 1 cup fresh raspberries Use fresh raspberries for best results.
Instructions
Preparation
- Preheat your oven to 350°F (175°C). Line an 8 x 8 inch baking pan with parchment paper, leaving some overhang.
- Make the crust: In a medium bowl, mix together the gluten-free flour, powdered sugar, and salt. Cut in the cold butter until the mixture resembles coarse crumbs. Press this mixture evenly into the bottom of your prepared pan.
- Bake the crust for about 15 minutes, or until lightly golden. Remove from the oven and set aside to cool slightly.
Filling
- Prepare the filling: In another bowl, whisk together the eggs, granulated sugar, lemon zest, and lemon juice until smooth. Gradually mix in the gluten-free flour until well combined. Gently fold in the fresh raspberries.
- Bake again: Pour the raspberry lemon filling over the cooled crust and return the pan to the oven. Bake for an additional 20-25 minutes, or until the filling is set.
- Cool and slice: Allow the bars to cool completely in the pan. Once cool, lift the bars out using the parchment paper overhang, and slice them into squares.